
DIY: Easy Ways to Patch Small Holes in Drywall – Repair Guide

Small wall damage is one of the most common home maintenance problems. From nail holes to dents, anchors, and accidental impacts, holes in drywall appear in nearly every home at some point. The good news is that most drywall repair is simple, affordable, and completely achievable with basic DIY tools.
This step-by-step guide explains how to repair small holes in drywall, medium hole damage, and even holes larger than 2 inches. You’ll learn how to choose the right patch drywall method, how to apply spackle or joint compound, and how to create a smooth and seamless finish that blends perfectly with your wall color.
Whether you need to fix nail holes, remove a screw anchor, or repair drywall after moving furniture, this guide covers everything you need to fix wall damage quickly and correctly.
Understanding Holes in Drywall and Why They Happen
Drywall is a lightweight wall material made from drywall paper wrapped around a gypsum core. While strong enough for daily living, it is still prone to damage. Holes around your house happen for many reasons, including:
- Nail holes from picture frames
- Screw or anchor removal
- Furniture bumps
- Door handle dents
- Accidental wall impacts
The size of the hole and the type of drywall determine the best repair method. Before you begin any hole repair, it’s important to identify the diameter of the damage and choose the correct materials.
Tools and Materials You’ll Need for Drywall Repair
Before you start, gather these basic supplies. Most are available at any hardware store.
- Putty knife
- Lightweight spackle or spackling compound
- Joint compound (for medium hole and larger drywall damage)
- Mesh patch or drywall patch kit
- Drywall tape
- Sandpaper (fine grit, 180–220)
- Utility knife
- Primer and paint
- Clean cloth
- Small piece of drywall (for holes larger than 2 inches)
Helpful tip: Keep all tools clean. Dried mud or compound on your putty knife can leave ridges that make the surface uneven.
Step-by-Step Guide to Patching Small Holes in Drywall
This section covers the most common wall damage: small holes in drywall that measure under ½ inch.
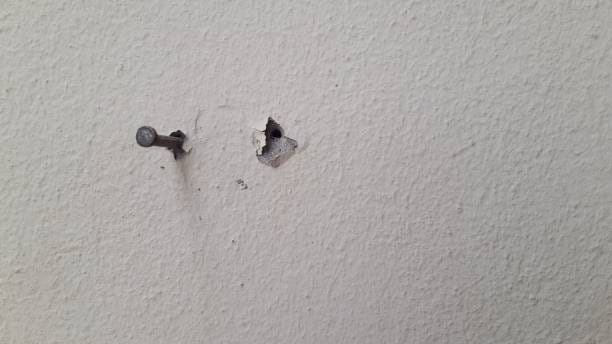
How to Repair Nail Holes and Tiny Dents
Nail holes are the easiest drywall holes to fix. They don’t require a drywall patch or tape.
Step-by-step:
- Remove debris
Gently remove loose drywall paper around the hole using a utility knife. - Fill the hole
Apply spackle directly into the hole using a putty knife. - Smooth the surface
Press firmly and scrape off excess compound. - Sand lightly
After drying, sand the surface until smooth. - Prime and paint
Apply primer and paint to match the wall color.
This method works for nail holes, pin-sized dents, and small drywall damage.
How to Fill Nail Holes in Drywall Correctly
Many people rush this step, but the right technique prevents cracks and visible marks later.
Best Way to Patch with Spackle
Use a lightweight spackling compound designed for drywall repair. It dries quickly and sands easily.
- Apply a thin coat
- Feather the edge outward
- Let it dry fully
- Sand lightly
- Add a second coat if needed
Once smooth, apply primer and paint.
Trustworthy reference:
The Family Handyman offers expert drywall patching tips:
https://www.familyhandyman.com/
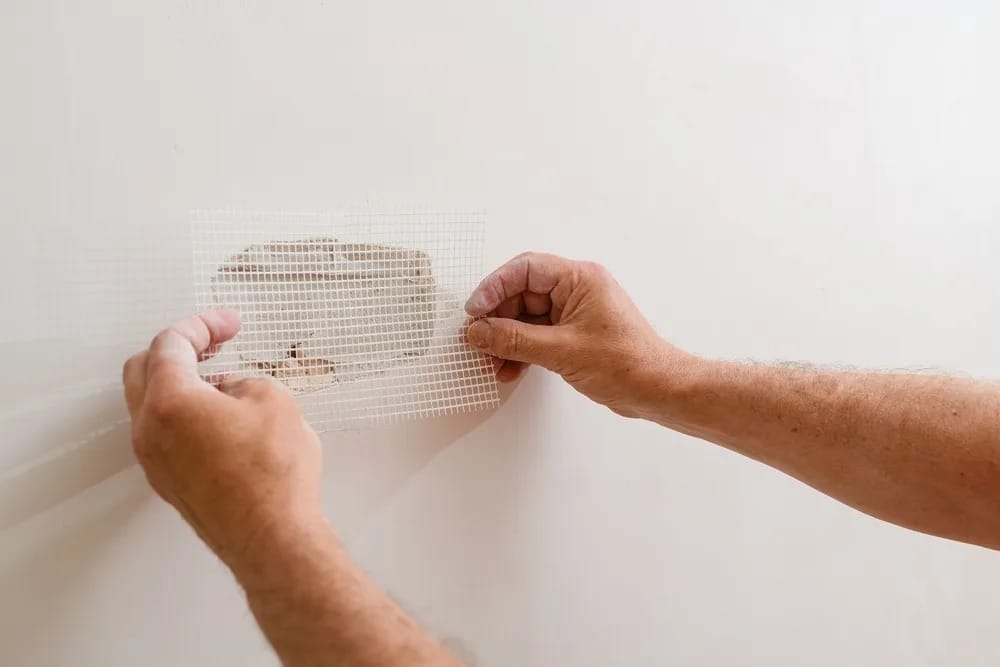
Repairing a Medium Hole in Drywall (½ Inch to 2 Inches)
A medium hole requires reinforcement so the compound doesn’t sink into the wall.
Using a Mesh Patch or Drywall Patch Kit
A mesh patch works well for holes between ½ inch and 2 inches.
Step-by-step guide:
- Remove loose drywall around the hole
- Stick the mesh patch directly over the damaged area
- Apply joint compound with a putty knife
- Feather outward around the hole
- Let dry
- Sand the surface smooth
- Apply a second coat if needed
Once dry, apply primer and paint for a smooth and seamless result.
Fixing Holes Larger Than 2 Inches in Drywall
When the diameter exceeds 2 inches, you need a structural repair.
Using a Piece of Drywall for Larger Holes
For holes larger than 2 inches, cut a small drywall square slightly bigger than the damaged area.
Steps:
- Cut out the damaged area into a clean square
- Insert backing strips inside the wall
- Screw the new piece of drywall in place
- Apply drywall tape
- Cover with joint compound
- Feather the edge
- Sand lightly between coats
- Prime and paint
Helpful resource:
U.S. Gypsum’s official drywall repair instructions:
https://www.usg.com
Common Mistakes to Avoid During Drywall Repair
- Applying too much compound at once
- Skipping sanding between coats
- Not feathering the edges
- Painting before the compound fully dries
- Forgetting primer before paint
Each mistake can make the entire patch visible.
Paint, Nail Holes & Repair Drywall Tips
Even after you patch drywall and sand the surface smooth, your repair isn’t complete until the wall is properly finished. Paint, blending, and correct touch-up techniques are what make nail holes and drywall holes truly disappear. This section focuses on final repair drywall steps, smart finishing tips, and how to make every patched area match the rest of your wall.
Tip: How to Make Drywall Repairs Invisible
A common mistake is thinking the patch is done once the hole is filled. The real magic happens in the final stages when you smooth, feather, and blend the entire patch into the wall.
Professional tip:
Always use thin layers and allow each coat to dry before sanding lightly. Thick coats crack and leave visible ridges.
- Use a clean putty knife
- Keep your compound smooth
- Feather outward beyond the damaged area
- Sand lightly between coats
These small steps create a smooth and seamless surface that disappears after paint is applied.
Larger Drywall Repairs: Finishing the Wall Properly
When working with larger drywall repairs, the finishing stage is critical. Even if the structure is solid, the wall will look uneven without proper feathering and sanding.
How to Blend Larger Drywall Patches into the Wall
- Apply joint compound over the entire patch drywall area
- Extend the compound several inches around the hole
- Feather the edges so they fade into the wall
- Let dry completely
- Sand lightly until smooth
Repeat if necessary until the patch blends with the surrounding wall.
Repair Drywall Holes: Final Sanding and Feathering
Once the compound dries, sanding determines how professional your repair looks.
How to Sand Lightly Without Damaging the Wall
- Use fine-grit sandpaper (180–220)
- Sand lightly in circular motions
- Avoid pressing hard
- Remove dust with a damp cloth
The goal is to smooth the surface without exposing the drywall paper underneath.
Patch Drywall: Removing Excess Compound
After sanding, inspect the wall under bright light. If you see ridges or uneven spots:
- Apply a thin coat of joint compound
- Feather the edge outward
- Let dry
- Sand lightly again
This ensures the entire patch is flat and invisible.
Fill the Hole: Final Paint Preparation
Before applying paint, always prime the repaired area. Compound absorbs paint differently than drywall, which can cause dull spots.
Why Primer Matters
- Seals the compound
- Helps paint stick evenly
- Prevents flashing
- Improves color match
Once the primer dries, apply a coat of paint that matches the wall color.
Nail Holes: Long-Term Wall Maintenance Tip
Tiny nail holes may seem harmless, but over time they collect dust and become visible. It’s best to fill nail holes in drywall as soon as you remove a nail or picture hanger.
Quick Nail Hole Repair Steps
- Remove the nail
- Fill the hole with spackle
- Smooth with a putty knife
- Sand lightly
- Prime and paint
This simple routine keeps your walls looking new and prevents long-term wall damage.
Final Repair Drywall Tip
Every hole repair, whether it’s nail holes, small holes in drywall, or larger drywall damage, depends on patience. Thin layers, light sanding, and careful feathering make all the difference.
With the right tools, materials, and step-by-step approach, you can confidently patch drywall, repair wall damage, and restore your home’s walls to a smooth, professional finish.


